


- دوره طراحی رابط کاربری و طراحی متریال Android قسمت اول: مفاهیم اولیه
- دوره طراحی رابط کاربری و طراحی متریال Android قسمت دوم: RecyclerView
- دوره طراحی متریال Android قسمت سوم: تولبار و منو Navigation Drawer
- دوره طراحی رابط کاربری و طراحی متریال Android قسمت چهارم: ViewPager و TabLayout
- دوره طراحی رابط کاربری و طراحی متریال Android قسمت پنجم: لایه طراحی CoordinatorLayout
در این قسمت شما را با لایه CoordinatorLayout آشنا میسازیم. برای بهره مندی از قابلیتهای مهم طراحی متریال آشنا بودن با این لایه نمایش بسیار مهم است.
لایه CoordinatorLayout چیست و چه کاربردی دارد؟
این لایه برای انیمیشن دادن به المانها کاربرد فراوانی دارد. با این لایه میتوانید قابلیتهای جالب و مهمی به رابط کاربری نرم افزار خود اضافه کنید. در ادامه دو مثال را برای درک کارکرد CoordinatorLayout با هم بررسی میکنیم.
مثال اول:
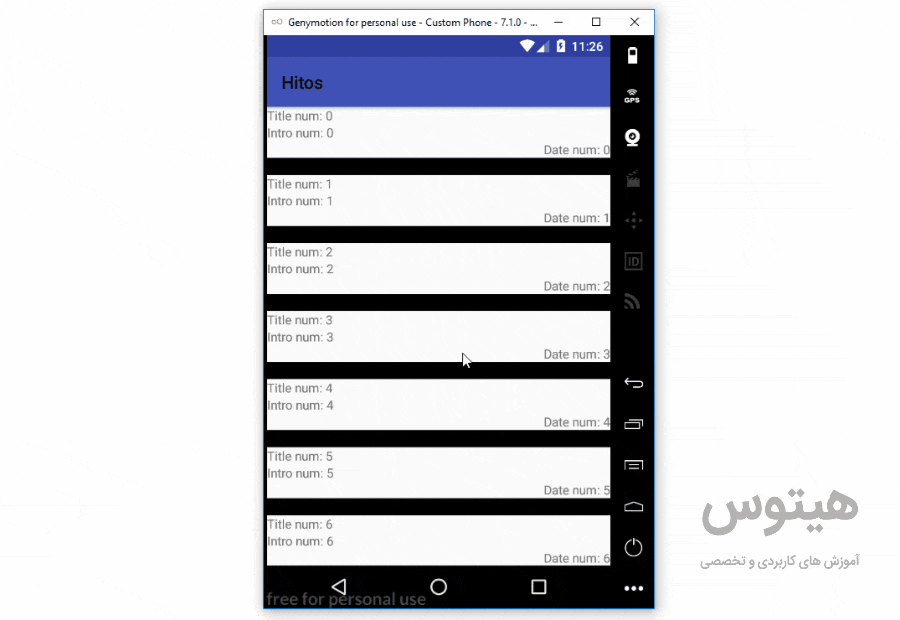
در مثال فوق به محض اسکرول شدن به سمت بالا Toolbar مخفی شده و پس از اسکرول به سمت پایین Toolbar باز میگردد.
مثال دوم:
در مثال فوق Toolbar پس از اسکرول شدن به سمت بالا حذف شده ولی TabLayout در تمام حالتها در صفحه باقی میماند.
در پایین قصد داریم مثال اول را پیاده سازی کنیم. به سورس دقت کنید:
<?xml version="1.0" encoding="utf-8"?>
<android.support.design.widget.CoordinatorLayout
    xmlns:android="http://schemas.android.com/apk/res/android"
    xmlns:app="http://schemas.android.com/apk/res-auto"
    android:layout_width="match_parent"
    android:layout_height="match_parent">
    <android.support.design.widget.AppBarLayout
        android:layout_width="match_parent"
        android:layout_height="wrap_content">
        <android.support.v7.widget.Toolbar
            android:id="@+id/toolbar"
            android:layout_width="match_parent"
            android:layout_height="?attr/actionBarSize"
            android:background="?attr/colorPrimary"
            app:layout_scrollFlags="scroll|enterAlways"/>
    </android.support.design.widget.AppBarLayout>
    <android.support.v7.widget.RecyclerView
        android:id="@+id/recycler"
        app:layout_behavior="@string/appbar_scrolling_view_behavior"
        android:layout_height="wrap_content"
        android:layout_width="match_parent" />
</android.support.design.widget.CoordinatorLayout>
کدهای بالا تلفیقی از کدهای اضافه کردن Toolbar و RecyclerView هستند که همگی درون تگ ریشه CoordinatorLayout قرار گرفته اند.
سطر 2: تگ CoordinatorLayout در این جا شروع شده و در آخر بسته میشود.
سطر 7: یک تگ به نام AppBarLayout اضافه کردیم تا Toolbar را در آن قرار دهیم.
سطرهای 10 تا 15: این سطرها در بر دارنده کدهای Toolbar هستند که کد موجود در سطر 15 برای غیب شدن Toolbar در اثر Scrool شدن و ظاهر شدن دوباره آنها اضافه شده اند.
سطرهای 17 تا 21: این سطرها یک RecyclerView به لایه نمایشی ما اضافه کرده اند. در سطر 19 یک خاصیت به نام app:layout_behavior به RecyclerView اضافه کرده ایم تا با تلفیق این RecyclerView و Toolbar بتوانیم انیمیشن مورد نظر را داشته باشیم.
در کلاس MainActivity نیز کدهای مورد نظر برای RecyclerView و Toolbar را اضافه میکنیم. اگر در این بخش مشکل دارید قسمتهای قبلی را مرور کنید.
نتیجه اجرا مانند زیر خواهد شد:
کدهای بالا را با DrawerLayout و NavigationLayout تلفیق میکنیم تا منو را نیز در Toolbar خود داشته باشیم. سورس لایه نمایش به شرح زیر است:
<?xml version="1.0" encoding="utf-8"?>
<android.support.v4.widget.DrawerLayout
    xmlns:android="http://schemas.android.com/apk/res/android"
    xmlns:app="http://schemas.android.com/apk/res-auto"
    android:id="@+id/drawerlayout"
    android:layout_width="match_parent"
    android:layout_height="match_parent"
    android:layoutDirection="rtl">
    <android.support.design.widget.CoordinatorLayout
        xmlns:android="http://schemas.android.com/apk/res/android"
        xmlns:app="http://schemas.android.com/apk/res-auto"
        android:layout_width="match_parent"
        android:layout_height="match_parent">
        <android.support.design.widget.AppBarLayout
            android:layout_width="match_parent"
            android:layout_height="wrap_content">
            <android.support.v7.widget.Toolbar
                android:id="@+id/toolbar"
                android:layout_width="match_parent"
                android:layout_height="?attr/actionBarSize"
                android:background="?attr/colorPrimary"
                app:layout_scrollFlags="scroll|enterAlways" />
        </android.support.design.widget.AppBarLayout>
        <android.support.v7.widget.RecyclerView
            android:id="@+id/recycler"
            android:layout_width="match_parent"
            android:layout_height="wrap_content"
            app:layout_behavior="@string/appbar_scrolling_view_behavior"/>
    </android.support.design.widget.CoordinatorLayout>
    <android.support.design.widget.NavigationView
        android:id="@+id/navigation_view"
        android:layout_width="250dp"
        android:layout_height="match_parent"
        android:layout_gravity="start"
        app:menu="@menu/navigation_menu">
    </android.support.design.widget.NavigationView>
</android.support.v4.widget.DrawerLayout>
طبیعتا کدهای Toolbar را باید در Activity اضافه کنید.
CoordinatorLayout به همراه TabLayout
پیاده سازی چنین لایه نمایشی بسیار مهم است و در مکانهای بسیاری کاربرد دارد. برای پیاده سازی این لایه غیر از مباحث گفته شده در بالا باید RecyclerViewها و TabLayoutها را نیز به کار بگیریم.
قبل از شروع این بخش به مبحث آموزش RecyclerView مراجعه کنید و محتویات فایلهای زیر را وارد این پروژه کنید:
recycler_view_item: برای ایجاد لایه نمایش هر آیتم RecyclerView
کلاس PostAdapter: سازنده RecyclerView
کلاس Posts: مدل دادههای Post
کلاس DataFakeGenerator: برای ایجاد اطلاعات موقت به منظور نمایش در برنامه
یک لایه به نام hitos_fragment مانند زیر ایجاد میکنیم:
<?xml version="1.0" encoding="utf-8"?>
<RelativeLayout xmlns:android="http://schemas.android.com/apk/res/android"
    android:layout_width="match_parent"
    android:layout_height="match_parent"
    android:background="#fff">
    <android.support.v7.widget.RecyclerView
        android:id="@+id/recyclerView"
        android:layout_width="match_parent"
        android:layout_height="wrap_content">
    </android.support.v7.widget.RecyclerView>
</RelativeLayout>
کلاس HitosFragment را مانند زیر ایجاد میکنیم:
public class HitosFragment extends Fragment {

    @Nullable
    @Override
    public View onCreateView(LayoutInflater inflater, @Nullable ViewGroup container, @Nullable Bundle savedInstanceState){
        View view=inflater.inflate(R.layout.hitos_fragment,container,false);
        RecyclerView recyclerView=(RecyclerView)view.findViewById(R.id.recyclerView);
        PostsAdapter postsAdapter=new PostsAdapter(getActivity(), DataFakeGenerator.getData());
        recyclerView.setLayoutManager(new LinearLayoutManager(getActivity(), LinearLayoutManager.VERTICAL, false));
        recyclerView.setAdapter(postsAdapter);
        return view;
    }

    public static HitosFragment newInstance(){

        Bundle args = new Bundle();

        HitosFragment fragment = new HitosFragment();
        fragment.setArguments(args);
        return fragment;
    }
}
ما در قسمت آموزش Fragment با متد onCreateView آشنا شدیم ولی در این قسمت بدلیل استفاده از RecyclerView این متد را به شکل بالا ویرایش میکنیم.
سطر 6: در این سطر یک View از روی لایه Fragment ایجاد کردیم.
سطرهای 7 تا 10: در این سطرها RecyclerView را فراخوانی کردیم. دستور getActivity() نام اکتیویتی اجرا کننده را دریافت میکند.
سطر 11: view ایجاد شده را با return از متد خارج میکنیم.
لایه نمایش activity_main را مانند زیر ویرایش میکنیم:
<?xml version="1.0" encoding="utf-8"?>
<android.support.v4.widget.DrawerLayout
xmlns:android="http://schemas.android.com/apk/res/android"
xmlns:app="http://schemas.android.com/apk/res-auto"
android:id="@+id/drawerlayout"
android:layout_width="match_parent"
android:layout_height="match_parent"
android:layoutDirection="rtl">
<android.support.design.widget.CoordinatorLayout
xmlns:android="http://schemas.android.com/apk/res/android"
xmlns:app="http://schemas.android.com/apk/res-auto"
android:layout_width="match_parent"
android:layout_height="match_parent">
<android.support.design.widget.AppBarLayout
android:layout_width="match_parent"
android:layout_height="wrap_content">
<android.support.v7.widget.Toolbar
android:id="@+id/toolbar"
android:layout_width="match_parent"
android:layout_height="?attr/actionBarSize"
android:background="?attr/colorPrimary"
app:layout_scrollFlags="scroll|enterAlways" />
<android.support.design.widget.TabLayout
android:id="@+id/tablayout"
android:layout_width="match_parent"
android:layout_height="wrap_content"/>
</android.support.design.widget.AppBarLayout>
<android.support.v4.view.ViewPager
android:id="@+id/viewpager"
android:layout_width="match_parent"
android:layout_height="match_parent"
app:layout_behavior="@string/appbar_scrolling_view_behavior"
/>
</android.support.design.widget.CoordinatorLayout>
<android.support.design.widget.NavigationView
android:id="@+id/navigation_view"
android:layout_width="250dp"
android:layout_height="match_parent"
android:layout_gravity="start"
app:menu="@menu/navigation_menu">
</android.support.design.widget.NavigationView>
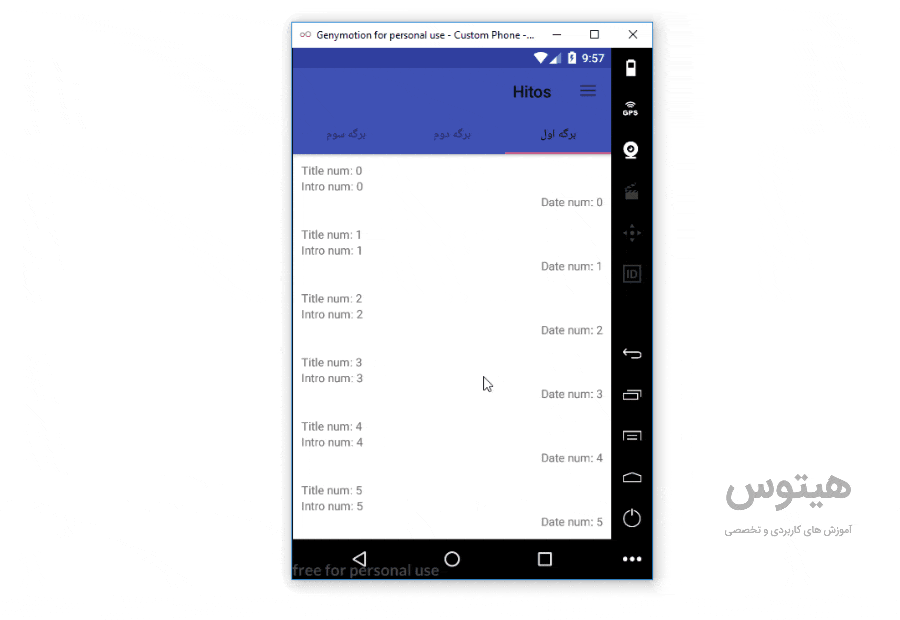
</android.support.v4.widget.DrawerLayout>همانطور که میبینید لایه ریشه فوق DrawerLayout است.
دو لایه CoordianatorLayout و NavigationView درون لایه DrawerLayout قرار گرفته اند.
درون CoordinatorLayout لایه AppBarLayout و ViewPager را داریم.
AppBarLayout دو لایه فوقانی پروژه یعنی Toolbar و TabLayout را در خود دارد.
ViewPager نیز طبیعتا زیر AppBarLayout قرار میگیرد.
کلاس MainActivity نیز سورس زیر را در بر دارد:
    @Override
    protected void onCreate(Bundle savedInstanceState) {
        super.onCreate(savedInstanceState);
        setContentView(R.layout.activity_main);

        Toolbar toolbar= (Toolbar) findViewById(R.id.toolbar);
        setSupportActionBar(toolbar);

        ActionBar actionBar= getSupportActionBar();
        actionBar.setDisplayHomeAsUpEnabled(true);
        actionBar.setHomeButtonEnabled(true);

        DrawerLayout drawerLayout = (DrawerLayout) findViewById(R.id.drawerlayout);
        ActionBarDrawerToggle drawerToggle = new ActionBarDrawerToggle(this, drawerLayout, toolbar, 0, 0);
        drawerToggle.syncState();

        ViewPager viewPager = (ViewPager) findViewById(R.id.viewpager);
        HitosViewPagerAdapter adapter = new HitosViewPagerAdapter(getSupportFragmentManager());
        viewPager.setAdapter(adapter);

        TabLayout tabLayout = (TabLayout) findViewById(R.id.tablayout);
        tabLayout.setupWithViewPager(viewPager);
    }
کدهای فوق باید برایتان آشنا باشد و با توجه به قسمتهای قبل تمام اجزای موجود در صفحه را فراخوانی کردیم.
نتیجه اجرای کدهای فوق مانند زیر خواهد بود:
CollapsingToolbarLayout در اندروید
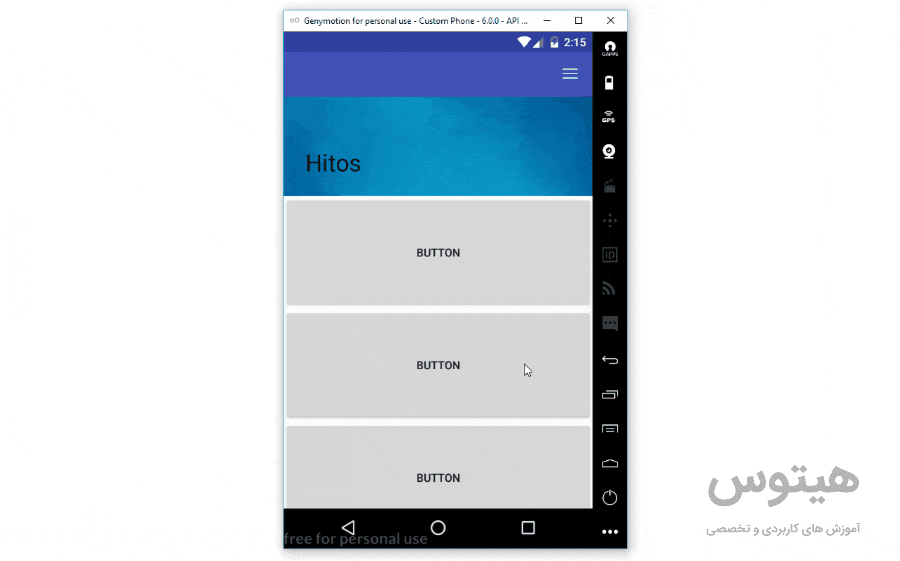
Collapsing به معنای انقباض است و همانطور که در بالا میبینید به محض اسکرول شدن یک تصویر ImageView منقبض شده و در Toolbar مخفی میشود.
لایه کاربری activity_main به شرح زیر است:
<?xml version="1.0" encoding="utf-8"?>
<android.support.design.widget.CoordinatorLayout xmlns:android="http://schemas.android.com/apk/res/android"
    xmlns:app="http://schemas.android.com/apk/res-auto"
    android:layout_width="match_parent"
    android:layout_height="match_parent"
    android:layoutDirection="rtl">
    <android.support.design.widget.AppBarLayout
        android:layout_width="match_parent"
        android:layout_height="wrap_content">
        <android.support.design.widget.CollapsingToolbarLayout
            android:layout_width="match_parent"
            android:layout_height="wrap_content"
            app:layout_scrollFlags="scroll|exitUntilCollapsed"
            app:titleEnabled="true">
            <ImageView
                android:layout_width="match_parent"
                android:layout_height="wrap_content"
                android:adjustViewBounds="true"
                android:scaleType="centerCrop"
                android:src="@drawable/navigation"
                app:layout_collapseMode="parallax" />
            <android.support.v7.widget.Toolbar
                android:id="@+id/toolbar"
                android:layout_width="match_parent"
                android:layout_height="?attr/actionBarSize"
                android:background="?attr/colorPrimary"
                app:layout_collapseMode="pin"
                app:theme="@style/ThemeOverlay.AppCompat.Dark" />
        </android.support.design.widget.CollapsingToolbarLayout>
    </android.support.design.widget.AppBarLayout>
    <android.support.v4.widget.NestedScrollView
        android:layout_width="match_parent"
        android:layout_height="wrap_content"
        app:layout_behavior="@string/appbar_scrolling_view_behavior">
        <LinearLayout
            android:layout_width="match_parent"
            android:layout_height="wrap_content"
            android:orientation="vertical">
            <Button
                android:foreground="?attr/selectableItemBackground"
                android:layout_width="match_parent"
                android:layout_height="140dp"
                android:text="Button" />
            <Button
                android:layout_width="match_parent"
                android:layout_height="140dp"
                android:text="Button" />
            <Button
                android:layout_width="match_parent"
                android:layout_height="140dp"
                android:text="Button" />
            <Button
                android:layout_width="match_parent"
                android:layout_height="140dp"
                android:text="Button" />
        </LinearLayout>
    </android.support.v4.widget.NestedScrollView>
</android.support.design.widget.CoordinatorLayout>
همانطور که در بالا میبینید لایه اصلی یک CoordinatiorLayout است.
درون لایه اصلی دو لایه AppBarLayout و NestedScrollView را قرار میدهیم.
مانند مطالب گفته شده در بالا AppBarLayout شامل بخشهایی خواهد شد که Scroll میشوند.
NestedScrollView که عملکردی مشابه ScrollView دارد باعث اسکرول شدن محتویات درونش میشود. در این جا نمیتوانیم از ScrollView استفاده کنیم چون تنها NestedScrollView پذیرای حرکتها و افکتهای ماست.
در خط 13 با app:layout_scrollFlags قابلیت اسکرول شدن را به CollapsingToolbarLayout میدهیم که مقدار آن scroll|exitUntilCollapsed است.
در سطر 14 با خاصیت app:titleEnabled امکان نمایش TIle را به برنامه خود میدهیم.
در سطر 21 با خاصیت app:layout_collapseMode به ImageView به این ImageView برای اسکرول شدن انیمیشن خاصی برابر parallax میدهیم. parallax به این معنی است که میزان اسکرول شدن این بخش دوبرابر میزان اسکرول کردن کاربر است.
تگ ها: android / اندرویدandroid studioطراحی متریال